
Bleed, Trim, and Safe Area: A Simple Guide to Print-Ready Files
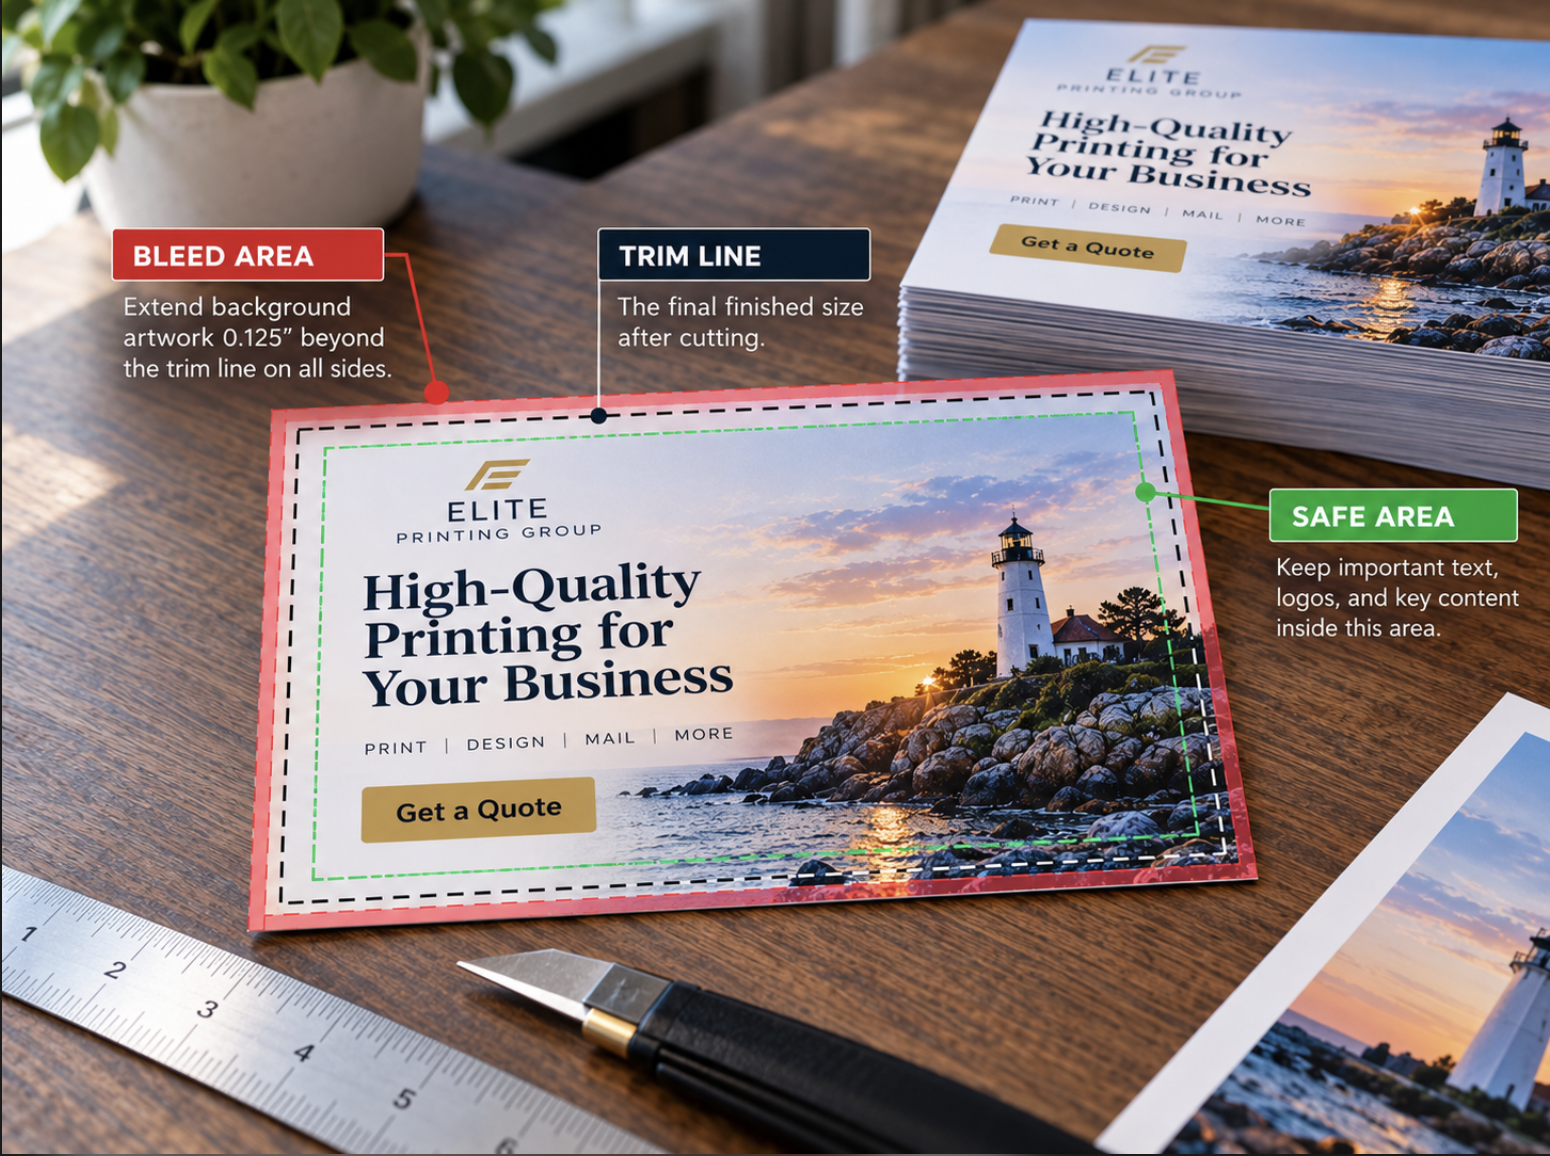
When preparing artwork for professional printing, you may encounter terms such as bleed, trim line, and safe area. Although these concepts are familiar to graphic designers and commercial printers, they can be confusing for business owners who only occasionally order brochures, business cards, postcards, or other marketing materials.
Understanding these terms is important because printed products don't always come directly off a press at their finished dimensions. Many projects involve printing on larger sheets and then cutting the material to its final size.
Even with professional production equipment, normal cutting tolerances mean that the position of the finished edge may vary slightly. If artwork hasn't been prepared with those tolerances in mind, important text could end up too close to the edge, or a background image might leave an unintended white strip after trimming.
Fortunately, these problems are often preventable.
By understanding the difference between bleed, trim, and safe area—and applying the appropriate specifications for your project—you can prepare artwork that is better suited for commercial printing.
This guide explains how each concept works, why it matters, and what to check before submitting your next print-ready file.
1. What Is the Trim Line in Printing?
The trim line represents the intended finished edge of a printed product.
For example, if you're ordering a standard 3.5-by-2-inch business card, those dimensions describe the finished card after cutting.
Depending on the production process, the artwork may be printed on a larger sheet containing multiple cards. The sheet is then cut down to produce the individual finished pieces.
The trim line identifies where the final edge is intended to be.
This distinction matters because the dimensions of your submitted artwork may include additional space outside the finished size.
A file containing bleed, for example, can have an overall artwork area that is larger than the intended finished product.
Why the Trim Line Matters
When reviewing a design on a computer screen, it's easy to focus on the artwork without thinking about the final cutting process.
However, the position of text, logos, photographs, and decorative elements should account for the finished dimensions.
If critical information extends too close to the trim line, small production variations could affect the appearance of the final piece.
The trim line therefore serves as the reference point for both the artwork extending outward into the bleed area and important content remaining inward within the safe area.
2. What Is Bleed in Printing?
Bleed is artwork that extends beyond the intended finished edge of a printed piece.
It's commonly used when a photograph, background color, illustration, or other graphic element should continue all the way to the edge without an unintended white border.
Imagine designing a business card with a dark blue background that fills the entire card.
If the blue background stops exactly at the trim line, even a slight cutting variation could leave a narrow strip of unprinted paper visible along one edge.
To reduce that risk, the background is extended beyond the finished dimensions.
After the piece is printed, the excess artwork is cut away during trimming.
The finished card then appears to have the background extending naturally to the edge.
How Much Bleed Is Typically Needed?
For many common commercial printing projects, a bleed allowance of 0.125 inches (one-eighth of an inch) on each side is a familiar industry specification.
However, this is not a universal requirement.
Different products, printing methods, and finishing processes may require different bleed allowances.
Large-format graphics, packaging, specialty products, and other applications can have requirements that differ from conventional business cards or brochures.
Always confirm the specifications provided for your particular project.
When Is Bleed Necessary?
Bleed is generally relevant when artwork is intended to reach the finished edge.
Examples include:
- A full-color background extending to the edge of a postcard.
- A photograph covering an entire brochure panel.
- Decorative graphics running off the edge of a business card.
- A full-page background image in a printed flyer.
- Other artwork designed to continue beyond the finished boundary.
Not every printed product requires bleed.
For example, a design with a white background and text positioned comfortably inside the page may not need artwork extending beyond the trim line.
The correct setup depends on both the design and the printing provider's requirements.
3. What Is the Safe Area in Printing?
The safe area is the region inside the trim line where important content should remain.
While bleed extends artwork outward beyond the finished edge, the safe area establishes an inward margin for essential information.
This helps reduce the risk of text, logos, or other important elements being affected by normal trimming variations.
For example, a business card may include an employee's name, job title, phone number, and email address.
If that information is positioned extremely close to the finished edge, the card may appear crowded, and small cutting variations could bring the text uncomfortably close to the boundary.
Moving the content farther inward creates a more practical layout.
What Should Stay Inside the Safe Area?
Important information generally includes:
- Company names and logos.
- Employee names and job titles.
- Phone numbers and email addresses.
- Website addresses.
- Headlines and important body text.
- QR codes and associated instructions.
- Promotional details and disclaimers.
- Other information that must remain fully visible.
A design may intentionally contain decorative elements that extend beyond the safe area, but essential content should normally remain within the recommended boundaries.
How Large Should the Safe Area Be?
The appropriate safe margin depends on the product.
Business cards, brochures, postcards, large-format graphics, and bound documents may have different requirements.
Folded materials may also need additional allowances around fold lines, while bound documents may require extra attention near the binding edge.
Rather than applying one arbitrary safe-area measurement to every project, confirm the recommendations for the specific product and finishing method.
4. Bleed vs. Trim vs. Safe Area: What's the Difference?
These three concepts work together, but each serves a different purpose.
| Term | What It Means | Why It Matters |
|---|---|---|
| Bleed | Extra artwork extending beyond the finished edge | Helps prevent unwanted white borders |
| Trim line | The intended finished edge of the printed product | Defines the final dimensions |
| Safe area | An inward region where essential information should remain | Helps protect text and logos from being too close to the cut |
A simple way to visualize the relationship is to think of three boundaries.
The outermost boundary represents the bleed area, where backgrounds and other edge-to-edge artwork continue beyond the finished size.
Inside that is the trim line, which defines the intended finished edge.
Farther inward is the safe-area boundary, which provides space for important content.
Background artwork extends outward into the bleed, while essential text and logos stay inward within the safe area.
This relationship is one of the most important principles of preparing artwork for trimmed commercial printing.
5. Example: Setting Up a Business Card With Bleed
A practical example makes these concepts easier to understand.
Suppose you're preparing artwork for a standard business card with a finished size of 3.5 inches wide by 2 inches tall.
The card uses a full-color background that extends to every edge.
For this hypothetical example, assume the printing provider requests 0.125 inches of bleed on all four sides.
The finished size remains:
3.5 × 2 inches
However, the background artwork extends an additional 0.125 inches beyond the left, right, top, and bottom edges.
This means the overall bleed dimensions would be:
3.75 × 2.25 inches
The calculation works as follows:
- Finished width: 3.5 inches.
- Additional bleed: 0.125 inches on the left and 0.125 inches on the right.
- Overall bleed width: 3.75 inches.
- Finished height: 2 inches.
- Additional bleed: 0.125 inches on the top and 0.125 inches on the bottom.
- Overall bleed height: 2.25 inches.
This example illustrates the relationship between finished dimensions and bleed.
It does not mean every business card PDF should use a 3.75-by-2.25-inch page size.
Depending on the software and printing workflow, the PDF may be exported with the finished trim size defined separately from an expanded bleed area.
The exact file setup should follow the printing provider's instructions.
Where Should the Text Go?
The employee's name, phone number, logo, and other essential information should remain within the recommended safe margin inside the 3.5-by-2-inch finished boundary.
The blue background extends into the bleed area, but the important content stays comfortably away from the trim edge.
This allows the background to be trimmed while maintaining a balanced, readable layout.
6. How to Set Up Bleed in Design Software
Most professional page layout and graphic design applications provide ways to establish document dimensions and bleed settings.
The exact controls differ between programs, but the general process is similar.
Step 1: Confirm the Finished Size
Before creating your document, establish the intended finished width and height.
If you're preparing a folded brochure or another product requiring special finishing, confirm any additional layout requirements first.
Step 2: Enter the Required Bleed
If the project requires bleed, enter the printing provider's specified allowance.
Some applications allow bleed to be defined separately from the page size.
Others require additional care when preparing the document or exporting the final artwork.
Step 3: Extend Background Artwork
Photographs, solid background colors, and decorative graphics intended to reach the edge should extend beyond the trim line and into the designated bleed area.
Simply adding empty space around the page is not enough.
The artwork itself must continue into the bleed region.
Step 4: Keep Important Content Inside the Safe Area
Position names, logos, contact information, and other essential elements within the recommended inward margins.
Consider how the finished product will look after trimming rather than designing exclusively around the full exported artwork area.
Step 5: Review the Final Export
Once the artwork has been prepared, export the document using the printing provider's required settings.
Open the exported file and verify that the finished dimensions, bleed, and content placement appear as intended.
If you're unsure about the setup, asking for clarification before production is generally easier than correcting an incorrectly prepared order later.
7. Do You Need Crop Marks?
Crop marks, sometimes called trim marks, are small lines placed outside the finished artwork to help indicate where a printed piece should be cut.
They are commonly associated with professional printing workflows, but they are not automatically required for every submitted file.
Some printers request PDFs containing crop marks, while others prefer files without them because their production systems handle trimming information differently.
Crop Marks Are Not the Same as Bleed
A common misunderstanding is that adding crop marks automatically makes a file print-ready.
However, crop marks only indicate intended cutting positions.
They do not create the extra background artwork needed for bleed.
A file can contain crop marks and still be missing the necessary bleed.
Likewise, a file can contain properly prepared bleed without requiring visible crop marks in the submitted PDF.
Follow the printing provider's specific instructions rather than adding marks automatically.
8. Understand How PDF Page Boxes Affect Printing
PDF files can contain several technical boundaries that define different parts of a document.
Understanding the basic distinction can be helpful when working with professional printing workflows.
Media Box
The media box defines the overall page area within the PDF.
It may include space beyond the finished page, depending on how the file was created.
Trim Box
The trim box identifies the intended finished page dimensions.
For a properly configured print PDF, this can help distinguish the final product size from additional production areas.
Bleed Box
The bleed box defines the region associated with the bleed allowance.
It typically extends beyond the trim box when the document includes bleed.
These settings may be managed automatically by professional design software when the document is exported correctly.
Not every printing project requires the customer to adjust PDF page boxes manually.
However, they help explain why a properly prepared print PDF may contain more information than simply the artwork visible at the finished dimensions.
If your printing provider requests a specific PDF standard or export preset, follow those instructions.
9. Special Considerations for Brochures, Booklets, and Large-Format Printing
The relationship between bleed, trim, and safe area becomes particularly important when artwork involves folding, binding, or larger finished dimensions.
Folded Brochures
A folded brochure may have several panels that need to align correctly after folding.
Depending on the folding method, panel widths may not be identical.
Important text should be positioned appropriately within each panel rather than too close to fold lines.
The required fold allowances and safe margins should be confirmed before the design is finalized.
Booklets and Bound Documents
Bound materials may require additional consideration near the spine or binding edge.
Text and graphics positioned too close to the binding area can become difficult to view or may be affected by the finishing process.
The correct setup depends on the binding method and document specifications.
Large-Format Graphics
Banners, posters, signs, and other large-format products may require different production allowances.
For example, some banners may involve hemming, grommets, or other finishing considerations that influence where important content should be placed.
These requirements should not be assumed to match those of a standard business card or brochure.
Elite Printing Group provides Small Format Printing and Large Format Printing services for businesses preparing different types of printed materials.
When requesting a quote, describe how the finished product will be used so the appropriate specifications can be discussed.
10. Common Bleed, Trim, and Safe-Area Mistakes to Avoid
Even experienced designers occasionally encounter print file preparation issues.
Understanding the most common mistakes can help prevent unnecessary revisions.
Ending Backgrounds at the Trim Line
If a photograph or background color stops exactly at the finished edge, small cutting variations may reveal an unintended white strip.
For edge-to-edge artwork, extend the design into the specified bleed area.
Placing Important Text Too Close to the Edge
Names, phone numbers, logos, and other important content should not depend on perfectly exact trimming.
Use the recommended safe margin to preserve readability and appearance.
Adding Bleed Without Extending the Artwork
Increasing the file dimensions doesn't automatically create useful bleed.
The background image or color must actually continue into the expanded area.
Assuming Every Project Uses the Same Specifications
A business card, folded brochure, poster, and banner may require different bleed and safe-area allowances.
Confirm the requirements instead of applying one universal setup.
Confusing Crop Marks With Bleed
Crop marks indicate intended cutting positions, but they do not replace the need for appropriate edge-to-edge artwork.
Only include crop marks when requested.
Exporting the Wrong Page Dimensions
A file may look correct in its original design software but contain incorrect page boundaries after export.
Always inspect the actual submitted PDF.
Forgetting Other Print-Ready Requirements
Bleed and safe area are important, but they are only part of file preparation.
Images, fonts, color settings, page order, and other specifications may also need review before production.
For a broader explanation, read our guide to Preparing Print-Ready Files.
11. What to Check Before Sending Artwork to a Printer
Before submitting your artwork, take a few minutes to review the exported file.
Use this practical checklist:
- The document uses the correct finished dimensions.
- The printing provider's bleed requirements have been confirmed.
- Edge-to-edge backgrounds extend into the bleed area where required.
- Important text, logos, and contact information remain inside the recommended safe area.
- Fold lines, binding areas, or other finishing requirements have been considered.
- Crop marks are included only if requested.
- Images have suitable resolution for their intended printed size.
- Fonts display correctly in the exported file.
- The PDF uses the required export settings.
- The finished page dimensions and bleed boundaries are correct.
- Contact details, spelling, and other important information have been proofread.
- The actual exported PDF has been opened and reviewed before submission.
Not every project requires the same preparation steps, but reviewing these essentials can help reduce avoidable problems.
Why Proper File Preparation Matters
Bleed, trim, and safe area may seem like minor technical details, but they play an important role in how professionally printed materials are produced.
The trim line establishes the intended finished dimensions. Bleed provides extra artwork beyond those dimensions when edge-to-edge printing is required. The safe area helps keep essential content comfortably within the finished boundaries.
Together, these concepts help designers prepare layouts that account for normal production tolerances.
Whether you're creating business cards, brochures, postcards, or larger promotional graphics, understanding these fundamentals can make the printing process more straightforward.
The most important step is to confirm the specifications for your particular project before finalizing the artwork.
Once those requirements are established, applying them consistently throughout the design and export process can help you prepare files with greater confidence.
Need Help Preparing Print-Ready Artwork?
Since 2006, Elite Printing Group has provided commercial printing, graphic design, and personalized service to businesses and organizations. Based in the Seacoast of New Hampshire, we serve customers throughout New England and offer nationwide shipping.
Whether you're preparing business cards, brochures, postcards, promotional materials, or large-format graphics, our team can help you discuss your project requirements and explore appropriate printing and design options.
Learn more about our Graphic Design Services, explore our Small Format Printing and Large Format Printing services, or Get a Quote to discuss your next project.